In this blog post I’m going to discuss Azure Extended Networks, why you might need them (but ideally shouldn’t) and how to set them up.
What are they?
Azure Extended Networks enable you to stretch an on-premises subnet into Azure to let on-premises virtual machines keep their original on-premises private IP addresses when migrating to Azure.
They provide a “virtual layer-2” connection via layer-3 IP subnet and are not stretched layer-2 broadcast domains.
Why might you need them?
This is a good question and, in my opinion, they should only be used as a temporary mechanism for certain failover or migration scenarios. I say this as Microsoft recommends that servers / services use networks that wholly exist in Azure, i.e. unique to your vNet(s) and not overlapping with on-premise networks. If you need hybrid connectivity then layer-3 routing will always be better in terms of performance, configuration and troubleshooting. Furthermore if you are designing a new Hybrid solution then it should design it based on different networks and IP subnets for both on-premise and Azure and ideally be able to tolerate the loss of either ‘site’.
There could be occasions, however, that you just need to migrate your virtual servers to Azure but they can’t tolerate IP address changes. For example, if you had a legacy solution or application whereby IP addresses were hard coded, or perhaps there was a convoluted and complex firewall rule matrix in place and/or it would take a lot of time to change the IP addressing scheme without knowing for sure what would break and you had a pressing urgency to migrate the solution to Azure, then ‘stretching’ the on-premise network to Azure could be really useful. Once in Azure, you could then plan the time needed to re-address your solution properly or migrate it back on-premise (Please note that stretching networks will most likely require some additional firewall configuration to allow traffic over the VPN or ExpressRoute connections)
What’s involved?
Firstly, please take a look at the official Microsoft documentation: https://docs.microsoft.com/en-us/windows-server/manage/windows-admin-center/azure/azure-extended-network
As ever, there is a great team behind this technology at Microsoft and they have produced some great documentation. That being said I’ll admit it took a day of head scratching to figure out exactly what’s required to get it working.
Convenient List Time
Below is a concise list of what you need and I will provide more details further in this blog
- A vNet in Azure configured with:
- Address space(s) to accommodate subnets for:
- A unique Azure subnet
- The on-premise subnet you wish to extend
- A GatewaySubnet
- Address space(s) to accommodate subnets for:
- A second on-premise network / subnet
- Not the network to be extended
- Will be used for the Local Network Gateway connection
- An Azure appliance VM
- Must be Windows Server ‘Azure Edition’
- Must be capable of nested virtualization (Dv3 or Ev3)
- Primary interface connected to the Azure subnet
- Secondary interface connected to the subnet to extend
- An On-premise appliance VM
- Windows Server 2019 or Windows Server 2022
- Must be capable of nested virtualization
- Primary interface connected to the second on-prem subnet
- Secondary interface connected to the subnet to extend
- A WAC server addressed into the second on-prem subnet
- A local virtual network gateway in Azure
- Configured with your on-prem public IP
- The second on-prem subnet added
- A virtual network gateway in Azure
- With public IP
- A Connection on the virtual network gateway using the local network gateway
- Site-to-site or Express Route
- A strong mug of coffee
- Can be decaff
- Green tea also accepted
How do they work?
Before we go any further, it’s worthwhile providing some details on how this technology works. I’m quoting directly from Microsoft in this section to ensure accuracy:

You can extend your on-premises subnets to Azure using a layer-3 overlay network based solution. Most solutions use an overlay technology such as VXLAN to extend the layer-2 network using an layer-3 overlay network. The diagram above shows a generalized solution. In this solution, the same subnet exists on both sides that is, Azure and on-premises.
The IP addresses from the subnet are assigned to VMs on Azure and on-premises. Both Azure and on-premises have an NVA inserted in their networks. When a VM in Azure tries to talk to a VM in on-premises network, the Azure NVA captures the packet, encapsulates it, and sends it over VPN/Express Route to the on-premises network. The on-premises NVA receives the packet, decapsulates it and forwards it to the intended recipient in its network. The return traffic uses a similar path and logic.
How did I get all this working?
I’m going to provide some more details of how I got this working from my Lab to Azure. Obviously any production solution would need careful consideration and so please see this as a guide only.
My use case for testing was actually to test Azure Site Recovery (ASR) and to confirm / PoC that you could indeed ‘stretch’ an on-premise network to Azure if needed and retain the IP address for any VM that is failed over to Azure.
Let’s start with the vNet
In my lab testing I used the following Address spaces to allow me to create the subnets I needed

I then created these subnets:
- OnPrem-Net1 – this is the on-premise network that I want to extend
- ASRFailoverSubnet – this is the wholly Azure subnet used by the Azure appliance
- GatewaySubnet – this is the subnet used by the virtual network gateway (I know the recommendation is for a /27 and this was just a PoC test)
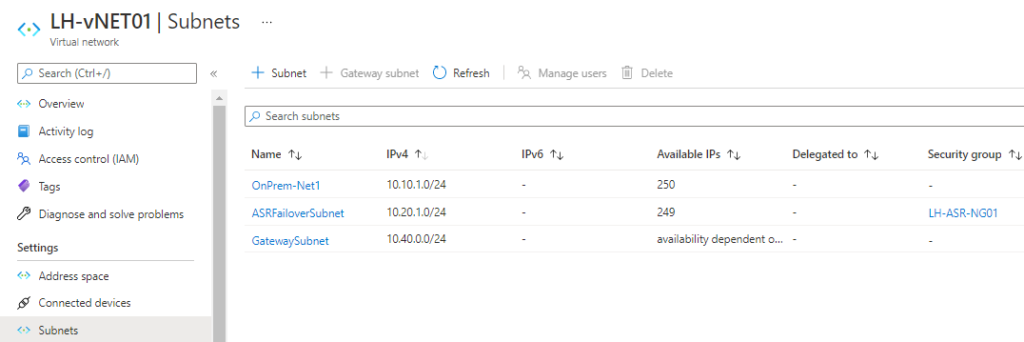
Now onto the Network Gateways & Connection
I created a Local Network Gateway using my on-prem public IP and local network gateway subnet:

Then I created a Virtual Network Gateway using a public IP from Azure

Here’s how I setup my local VPN Connection
I configured my local VPN connection settings

And configured firewall rules on the VPN Connection

Now we configure the on-premise Appliance
The on-premise appliance can be Windows Server 2019 and 2022.
The on-premise appliance requires 2 x IP addresses for it’s 2 x adapters. The primary adapter is addressed into the second on-premise [gateway] subnet and configured with an appropriate gateway. The second adapter is addressed into the network / subnet you want to extend.
The adapters are VMNetwork adapters created from 2 x Virtual Switches bound to each raw adapter.
Install-WindowsFeature -Name Hyper-V -IncludeManagementTools -Restart

New-VMSwitch -Name "External" -AllowManagementOS $true -NetAdapterName "Ethernet"

New-VMSwitch -Name "Extended" -AllowManagementOS $true -NetAdapterName "Ethernet 2"

And the Azure Appliance
The Azure appliance has to be deployed with Windows Server 2022 Datacenter Azure Edition and be capable of nested virtualization, which are currently Dv3 or Ev3 sizes.
The Azure appliance requires 2 x IP addresses for it’s 2 x adapters. The primary adapter is addressed into the Azure [gateway] subnet and configured with an appropriate gateway. The second adapter is addressed into the network / subnet you want to extend.
The adapters are VMNetwork adapters created from 2 x Virtual Switches bound to each ‘Microsoft Hyper-V Network’ adapter.
Install-WindowsFeature -Name Hyper-V -IncludeManagementTools -Restart

New-VMSwitch -Name "External" -AllowManagementOS $true -NetAdapterName "Ethernet"

New-VMSwitch -Name "Extended" -AllowManagementOS $true -NetAdapterName "Ethernet 2"

Onto the finishing straight with the WAC Deployment
If you haven’t already got a WAC server in the second [gateway] on-premise subnet then deploy a server and install the latest version of WAC
On the WAC server, install the ‘Azure Extended Network’ Extension
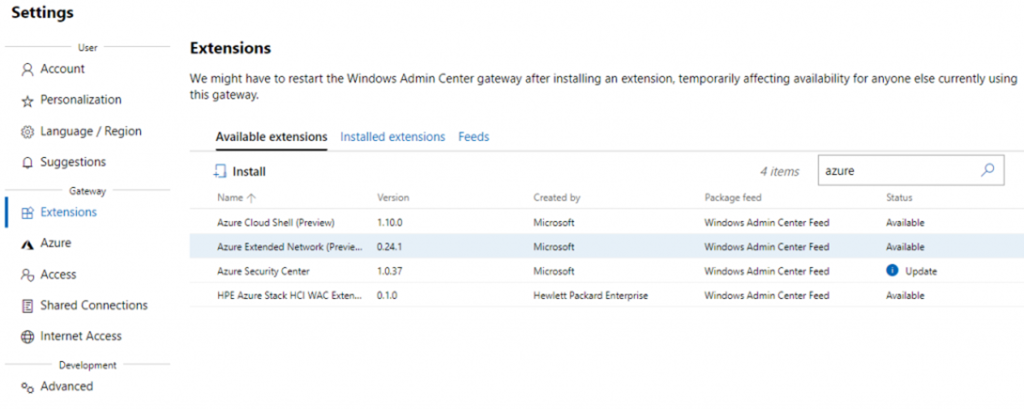
Then connect to the on-premise appliance and click on the Azure Extended Network blade

Click ‘Set up’ and follow the steps in the wizard

Click next to advance in the setup process to select the “to be extended” network. In my setup this will be the 10.10.1.0/24/24 network

Click next, and login to your Azure Subscription and select the resource group, network and extended subnet.
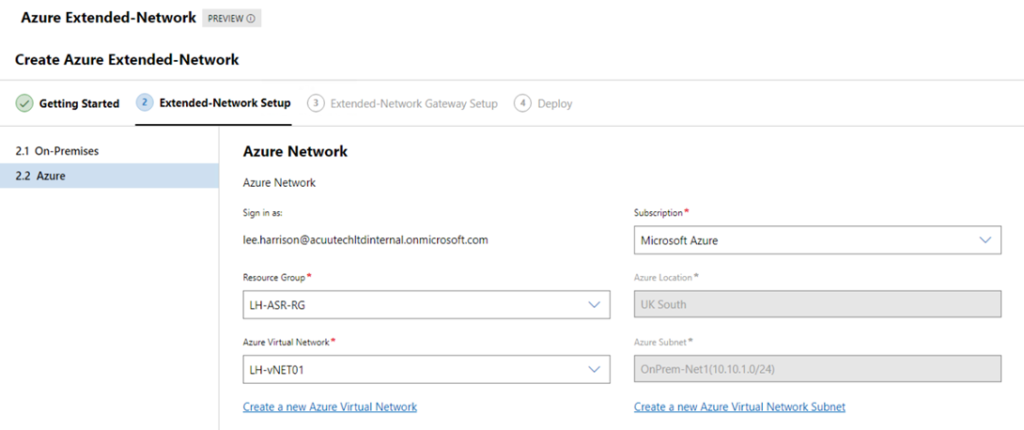
Then ensure the details are correct for the on-premise appliance
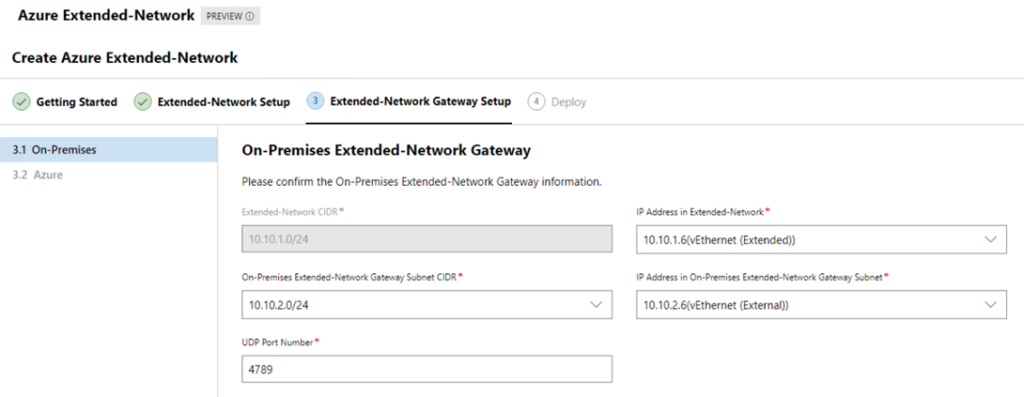
(The subnet should be grayed out, as this subnet should be the same as on-premises)
Next, select the Azure appliance VM we provisioned earlier (running Hyper-V) – select the resource group it is in and configure the networks.
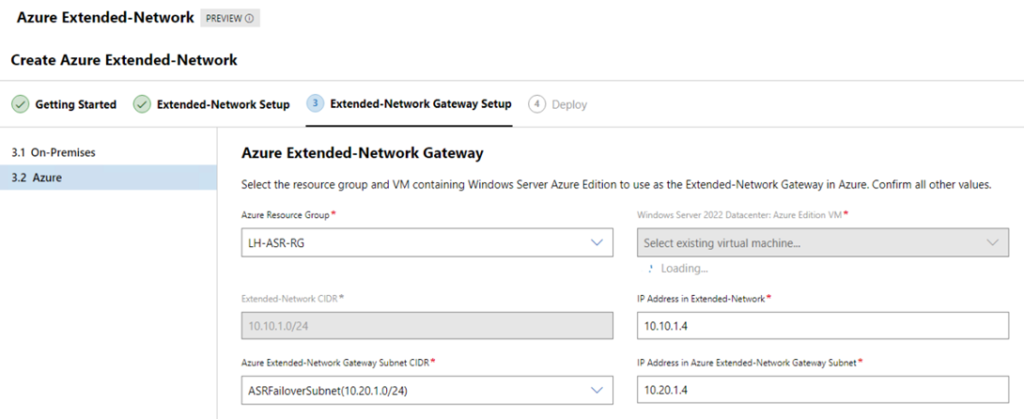
Finally, review the configuration and click Deploy…
Now to actually configure extended IP Addresses
After the deployment a new screen will open which allows us to add the individual IP addresses and where they are located. Note that you have to deploy a VM first in Azure after which it will become available in the portal after a few minutes to be added to the extended Network routing tables. In my example I failed over a VM using ASR and configured it with the same on-premise IP Address.
The VM, now running in Azure, retained the on-premise IP address of 10.10.1.203. But that doesn’t mean it would just be able to communicate with my on-premise servers.
Firstly, you need to check that the connection between on-prem and Azure is connected. In my example I use the site2site VPN connection mentioned above.
Secondly, you need to ‘extend’ the on-premise servers that you wish to communicate with the Azure VM in the extended network. This then is [almost] the final piece and allows the endpoints to work over the VXLAN tunnel.
In my example below, the VM now running in Azure (10.10.1.203) can now communicate with my two on-premise VMs: 10.10.1.50 & 10.10.1.20.

The final [final] piece will obviously be to configure firewall rules to allow comms in the usual manner you would even without an extended network.
Conclusions
As I said, it took me a day of head scratching to get all this working, but once it was setup it worked pretty well. I haven’t gone into any level of performance or resiliency testing and understand there is a performance impact with using this technology due to a reduced MTU for the virtualization overhead and latency will be slightly higher. Resiliency is constrained to the fact you have 1 x appliance at each end and if that went offline then the communication between on-premise and Azure servers would obviously be interrupted.
I would not recommend using this technology for vast quantities of servers and Microsoft states: “You can extend up to 250 IP addresses using extended network for Azure. You can expect an aggregate throughput of about 700 Mbps, with some variability depending on the CPU speed of the extended network for Azure virtual appliances.”
Overall this technology could be a real life saver if you were under some urgent time pressure to move servers / services to Azure, but ideally any hybrid connectivity will be party to a well thought out design that allows for unique and wholly Azure subnets to be used.
I hope you found this post useful and thanks for visiting.
Thank you. Also trying to PoC this solution but staked at Extended-Network gateway setup on WAC. WAC not detecting my extended subnet inside vNet but i already created it days ago.
Hi Taryel, it’s been a while since I tested this feature to be honest. Did you deploy WAC into the second on-premises [gateway] subnet. Other than that are the WAC extensions up to date and presume you have tried refreshing the WAC session. Is your site-to-site connection definitely connected to Azure?